
Tiny Platformer - adding tiny monsters
Sun, Jun 2, 2013
Last week’s tiny platformer article was going to be a standalone article about a quick and dirty platform mechanic, but it’s not much of a challenge without treasure to collect or monsters to avoid.
So this is a quick follow up article to show how you might add very simple entities to provide both of these features.
Starting with the code from the last article, we can:
- define entities with Tiled
- use ajax to load level data
- setup monsters and treasure
- refactor the player
update()to be re-usable by the monsters - have monsters turn around at the edge of platforms
You can view the source code or “play” the game below.
Defining entities
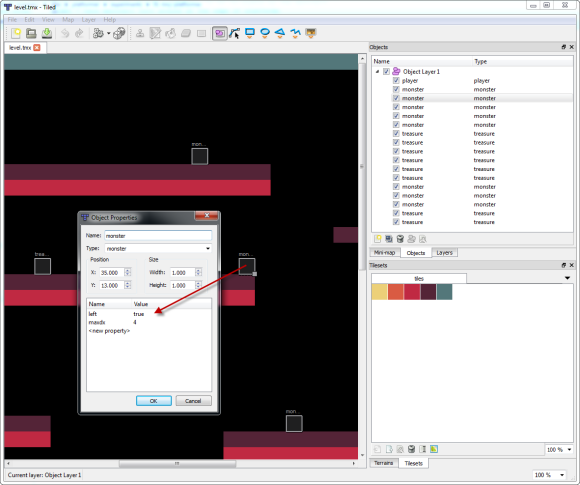
In addition to defining our platform layout, we can now use the Tiled editor to add our entities.
- Add an ‘object’ layer
- Draw an object for the player (starting position)
- Draw objects for each monster
- Draw objects for each treasure
We can also give each monster additional properties, such as a maxdx speed, and a left or right direction.
Using AJAX to load level.json
Since we’re now using more than just the array of cells from the level editor, it makes sense to load the entire file output from the editor. We will export the level in JSON format and then use a small AJAX helper method to load it at run-time:
function get(url, onsuccess) {
  var request = new XMLHttpRequest();
  request.onreadystatechange = function() {
    if ((request.readyState == 4) && (request.status == 200))
      onsuccess(request);
  }
  request.open("GET", url, true);
  request.send();
}
With this helper in place, our game can be started by loading the file, and when complete, setting up the map and starting the first frame:
get("level.json", function(req) {
  setup(JSON.parse(req.responseText));
  frame();
});
Setup the map and entities
Having loaded the JSON data output by our level editor, we can use it to setup the new entities in addition
to the cells that contain the platform data.
function setup(map) {
  var data    = map.layers[0].data,     // the platforms
      objects = map.layers[1].objects,  // the entities
      n, obj, entity;

  for(n = 0 ; n < objects.length ; n++) {
    obj = objects[n];
    entity = setupEntity(obj);
    switch(obj.type) {
    case "player"   : player = entity; break;
    case "monster"  : monsters.push(entity); break;
    case "treasure" : treasure.push(entity); break;
    }
  }

  cells = data;
}

function setupEntity(obj) {
  var entity = {};
  entity.x        = obj.x;
  entity.y        = obj.y;
  entity.dx       = 0;
  entity.dy       = 0;
  entity.gravity  = METER * (obj.properties.gravity || GRAVITY);
  entity.maxdx    = METER * (obj.properties.maxdx   || MAXDX);
  entity.maxdy    = METER * (obj.properties.maxdy   || MAXDY);
  entity.impulse  = METER * (obj.properties.impulse || IMPULSE);
  entity.accel    = entity.maxdx / (obj.properties.accel    || ACCEL);
  entity.friction = entity.maxdx / (obj.properties.friction || FRICTION);
  entity.monster  = obj.type == "monster";
  entity.player   = obj.type == "player";
  entity.treasure = obj.type == "treasure";
  entity.left     = obj.properties.left;
  entity.right    = obj.properties.right;
  return entity;
}
NOTE: We can (optionally) give each object unique properties within the editor, allowing us to setup monster entities that have different characteristics, e.g. different directions, speeds, acceleration, even varying the effects of gravity on a per-entity basis.
Updating Monsters
The update() method in the original tiny platformer was all about the player, but if we
extract that code into a separate updateEntity() method then we can re-use it for the
new monster entities as well:
function update(dt) {
  updatePlayer(dt);
  updateMonsters(dt);
}

function updatePlayer(dt) {
  updateEntity(player, dt);
}

function updateMonsters(dt) {
  var n, max;
  for(n = 0, max = monsters.length ; n < max ; n++)
    updateMonster(monsters[n], dt);
}

function updateMonster(monster, dt) {
  if (!monster.dead)
    updateEntity(monster, dt);
}
The only change we need to make to the extracted updateEntity() method is to ensure
that the monster entities turn around when they hit either a wall or the edge of a platform:
function updateEntity(entity, dt) {

  ...

  if (entity.monster) {
    if (entity.left && (cell || !celldown)) {
      entity.left = false;
      entity.right = true;
    }
    else if (entity.right && (cellright || !celldiag)) {
      entity.right = false;
      entity.left  = true;
    }
  }

}
We can also extend the updateMonster() method to detect any collisions with the player. Notice
how easily we can provide the ability for either the monster to kill the player, or vice versa,
by detecting if the player is currently falling onto the monster.
function updateMonster(monster, dt) {

  ...

  if (overlap(player.x, player.y, TILE, TILE, monster.x, monster.y, TILE, TILE)) {
    if ((player.dy > 0) && (monster.y - player.y > TILE/2))
      killMonster(monster);
    else
      killPlayer(player);
  }

}

function killMonster(monster) {
  monster.dead = true;
}

function killPlayer(player) {    // go back to the start
  player.x = player.start.x;
  player.y = player.start.y;
  player.dx = player.dy = 0;
}
Finally, we can add a new method to check for any collisions between the player and any treasure:
function checkTreasure() {
  var n, max, t;
  for(n = 0, max = treasure.length ; n < max ; n++) {
    t = treasure[n];
    if (!t.collected && overlap(player.x, player.y, TILE, TILE, t.x, t.y, TILE, TILE))
      t.collected = true;
  }
}
Rendering
Rendering is generally the same as it was before. We continue to use plain vanilla <canvas> fillRect() calls, except
we break our rendering method into its component parts to keep it simple, and remember to avoid rendering monsters that are
dead or treasure that has been collected:
function render(ctx, frame, dt) {
  renderMap(ctx);
  renderTreasure(ctx, frame);
  renderPlayer(ctx, dt);
  renderMonsters(ctx, dt);
}

function renderMap(ctx) {
  var x, y, cell;
  for(y = 0 ; y < MAP.th ; y++) {
    for(x = 0 ; x < MAP.tw ; x++) {
      cell = tcell(x, y);
      if (cell) {
        ctx.fillStyle = COLORS[cell - 1];
        ctx.fillRect(x * TILE, y * TILE, TILE, TILE);
      }
    }
  }
}

function renderPlayer(ctx, dt) {
  ctx.fillStyle = COLOR.YELLOW;
  ctx.fillRect(player.x + (player.dx * dt), player.y + (player.dy * dt), TILE, TILE);
}

function renderMonsters(ctx, dt) {
  ctx.fillStyle = COLOR.SLATE;
  var n, max, monster;
  for(n = 0, max = monsters.length ; n < max ; n++) {
    monster = monsters[n];
    if (!monster.dead)
      ctx.fillRect(monster.x + (monster.dx * dt), monster.y + (monster.dy * dt), TILE, TILE);
  }
}

function renderTreasure(ctx, frame) {
  ctx.fillStyle = COLOR.GOLD;
  var n, max, t;
  for(n = 0, max = treasure.length ; n < max ; n++) {
    t = treasure[n];
    if (!t.collected)
      ctx.fillRect(t.x, t.y + TILE/3, TILE, TILE*2/3);
  }
}
Conclusion
… and thats pretty much all it takes to add some enemies for the player to avoid and some rewards for the player to collect.
Enjoy!